Showing posts with label linux. Show all posts

Saturday, June 12, 2010

Securing Debian Configuration checklist


  • Limit physical access and booting capabilities


    • Enable BIOS password


    • Disable floppy booting


    • Set a LILO or GRUB password (/etc/lilo.conf or
      /boot/grub/menu.lst, respectively); check that the LILO or GRUB
      configuration file is read-protected.


    • Disallow MBR floppy booting back door by overwriting the MBR (maybe not?)


  • Partitioning


    • Separate user-writable data, non-system data, and rapidly changing run-time
      data to their own partitions


    • Set nosuid,noexec,nodev mount options in /etc/fstab
      on ext2 partitions such as /tmp


  • Password hygiene and login security


    • Set a good root password


    • Enable password shadowing and MD5


    • Install and use PAM


      • Add MD5 support to PAM and make sure that (generally speaking) entries in
        /etc/pam.d/ files which grant access to the machine have the
        second field in the pam.d file set to "requisite" or
        "required".


      • Tweak /etc/pam.d/login so as to only permit local root logins.


      • Also mark authorized tty:s in /etc/security/access.conf and
        generally set up this file to limit root logins as much as possible.


      • Add pam_limits.so if you want to set per-user limits


      • Tweak /etc/pam.d/passwd: set minimum length of passwords higher (6
        characters maybe) and enable md5


      • Add group wheel to /etc/group if desired; add pam_wheel.so
        group=wheel entry to /etc/pam.d/su


      • For custom per-user controls, use pam_listfile.so entries where appropriate


      • Have an /etc/pam.d/other file and set it up with tight security


    • Set up limits in /etc/security/limits.conf (note that
      /etc/limits is not used if you are using PAM)


    • Tighten up /etc/login.defs; also, if you enabled MD5 and/or PAM,
      make sure you make the corresponding changes here, too


    • Disable root ftp access in /etc/ftpusers


    • Disable network root login; use su(1) or sudo(1).
      (consider installing sudo)


    • Use PAM to enforce additional constraints on logins?


  • Other local security issues


    • Kernel tweaks


    • Kernel patches


    • Tighten up logfile permissions (/var/log/{last,fail}log, Apache
      logs)


    • Verify that setuid checking is enabled in /etc/checksecurity.conf


    • Consider making some log files append-only and configuration files immutable
      using chattr (ext2 filesystems only)


    • Set up file integrity . Install debsums


    • Consider replacing locate with slocate


    • Log everything to a local printer?


    • Burn your configuration on a bootable CD and boot off that?


    • Disable kernel modules?


  • Limit network access


    • Install and configure ssh (suggest PermitRootLogin No in
      /etc/ssh, PermitEmptyPasswords No; note other suggestions in text
      also)


    • Consider disabling or removing in.telnetd


    • Generally, disable gratuitous services in /etc/inetd.conf using
      update-inetd --disable (or disable inetd altogether, or use a
      replacement such as xinetd or rlinetd)


    • Disable other gratuitous network services; mail, ftp, DNS, www etc should not
      be running if you do not need them and monitor them regularly.


    • For those services which you do need, do not just use the most common programs,
      look for more secure versions shipped with Debian (or from other sources).
      Whatever you end up running, make sure you understand the risks.


    • Set up chroot jails for outside users and daemons.


    • Configure firewall and tcpwrappers (i.e. hosts_access(5)); note
      trick for /etc/hosts.deny in text


    • If you run ftp, set up your ftpd server to always run chrooted to the user's
      home directory


    • If you run X, disable xhost authentication and go with ssh instead; better yet,
      disable remote X if you can (add -nolisten tcp to the X command line and turn
      off XDMCP in /etc/X11/xdm/xdm-config by setting the requestPort to
      0)


    • Disable outside access to printers


    • Tunnel any IMAP or POP sessions through SSL or ssh; install stunnel if you want
      to provide this service to remote mail users


    • Set up a loghost and configure other machines to send logs to this host
      (/etc/syslog.conf)


    • Secure BIND, Sendmail, and other complex daemons (run in a chroot jail; run as
      a non-root pseudo-user)


    • Install snort or a similar logging tool.


    • Do without NIS and RPC if you can (disable portmap).


  • Policy issues


    • Educate users about the whys and hows of your policies. When you have
      prohibited something which is regularly available on other systems, provide
      documentation which explains how to accomplish similar results using other,
      more secure means.


    • Prohibit use of protocols which use cleartext passwords (telnet, rsh and
      friends; ftp, imap, http, ...).


    • Prohibit programs which use SVGAlib.


    • Use disk quotas.


  • Keep informed about security issues


    • Subscribe to security mailing lists


    • Subscribe to security updates -- add to /etc/apt/sources.list an
      entry (or entries) for http://security.debian.org/debian-security


    • Also remember to periodically run apt-get update ; apt-get upgrade
      (perhaps install as a cron job?).


Monday, May 17, 2010

HOWTO: Setting up QEMU on Ubuntu with TUN/TAP and NAT

Step 1) Compile and setup of Qemu and KQemu
Step 2) Installation of GuestOS [ Windows 98se in this example ]
Step 3) Setup of Tun/Tap network interface on host and guest OS.
Step 4) NAT setup to allow guestOS access to the internet.

*note: KQEMU is the QEMU Accelorator

Brief Description:
QEMU is an Open-Source Emulator that emulates x86 arch as well as several others.... allowing for guestOS's to be installed inside the host OS.
QEMU is available for Linux, Mac, and Windows. We'll be covering the Linux Package in this HowTo.
For more information on QEMU visit the projectpage @ http://fabrice.bellard.free.fr/qemu/

What you'll need:
+ QEMU source tarball from http://fabrice.bellard.free.fr/qemu/
+ KQEMU binary tarball from http://fabrice.bellard.free.fr/qemu/
+ linux-headers package
+ IPTables ( should already be installed ) package
+ libsdl1.2-dev package
+ Tun/Tap package
+ uml-utilities package
+ windows98 install cd and valid windows98 serial.
+ GCC-3.4 package

Ok, so this is the first HowTo i've wrote in quite a long time. First for ubuntu, and Qemu..


################################################## ##############
[ Step 1 ] - Compilation and Installation of KQEMU and QEMU

Outlined here is the steps taken to compile and setup Qemu and Kernel Module KQemu

A) Download the latest source tarball of QEMU from http://fabrice.bellard.free.fr/qemu/download.html current version is 0.8.1
B) Download the latest binary of KQEMU from http://fabrice.bellard.free.fr/qemu/qemu-accel.html

C) Move the tarballs to your /usr/local/src directory and deflate
#> sudo mv qemu-version.tar.gz /usr/local/src/
#> sudo mv kqemu-version.tar.gz /usr/local/src/

deflate...
#> sudo gunzip qemu-version.tar.gz; sudo tar -xvf qemu-version.tar
#> sudo gunzip kqemu-version.tar.gz; sudo tar -xvf kqemu-version.tar

D) Install linux-headers for your current kernel version.
If you don't know your current kernel version you can do `uname -r` at the shell to find out...

#> sudo apt-get install linux-headers-`uname -r`

E) Install GCC-3.4 [ qemu complains on GCC-4 ] and libsdl1.2-dev

#> sudo apt-get install gcc-3.4 libsdl1.2-dev

locate the installed gcc-3.4 binary using whereis
#> whereis gcc-3.4

it should be located in /usr/bin/ if not found at all installation failed. repeat step E.
make a note of it's location. you're going to need it in step F

F) Configure and Compile QEMU and KQEMU

change directories to your qemu-source you deflated in step C
#> cd /usr/local/src/qemu-version
#> sudo ./configure --cc=/usr/bin/gcc-3.4 [ remember the location of it from step E? ]

once configuration is completed run make and make install to compile and install... do so as follows

#> sudo make
#> sudo make install

verify that QEMU installed correctly...
#> whereis qemu

change directories to your kqemu-source you deflated in step C, and configure make and make install

#> cd /usr/local/src/kqemu-version
#> sudo ./configure
#> sudo make
#> sudo make install

verify that device node /dev/kqemu exists
if not...execute following commands

#> sudo mknod /dev/kqemu c 250 0
#> sudo chmod 666 /dev/kqemu

Active module KQEMU
#> sudo modprobe kqemu
Verify that it loaded properly
#> lsmod | grep kqemu
If it failed to show up. issue a dmesg | tail to see what the error was
#> dmesg | tail
Anyway... continuing...

[ Step 1 Completed ]
################################################## ################


[ Step 2 ] Installing Guest OS
*notes: you can use either the actual install CD or an ISO made from the original install disk, I used an iso.
you can also use the dd command with the seek option to create your hard disk image file, in place of qemu-img create
for convenience we're going to use the qemu-img binary installed with QEMU

*help: Run qemu/qemu-img without any arguements to view it's help

A) Create the Hard Drive Image File to use as HDA
choose the directory you wish to store your disk images you can use mkdir to create a new one. I use ~/qemu
#> cd ~/qemu
A brief rundown of what we're executing here....
qemu-img create [filename] [-f format( raw, vvfat, cloop,... )] [size G(gigs), M(megs) ]
#> qemu-img create win98.img -f raw 2G
Ok, we've created the 2G image file to install windows98se into....now we load QEMU to boot from the cdrom/iso file specified to start installation

#> qemu -hda win98.img -cdrom /dev/cdrom -boot d -localtime -net nic -net tap
Now QEMU should boot from CD, just follow the steps to complete the installation...

Once installation has completed now we can move onto Step 3
[ Step 2 Complete ]
################################################## ################

[ Step 3 ] Setting up TUN/TAP network interface on HostOS and GuestOS

A) Install uml-utilities via apt
#> sudo apt-get install uml-utilities
B) Load kernel module tun
#> sudo modprobe tun66.202.65.50
C) Create the /dev/net/tun device node
#> mkdir /dev/net
#> mknod /dev/net/tun c 10 200
D) Setup the tap0 interface, with an ip address i use 192.168.100.1 for this.
Create the tap0 interface using tunctl
#> sudo tunctl

Give it an IP-Address
#> sudo ifconfig tap0 192.168.100.1 up
Make sure it was configured properly...
#> ifconfig

You should see tap0 with an inet addr: 192.168.100.1 and a Mask: 255.255.255.0
If there is no mask set...sometimes this happens don't know why but it's happend....do this
#> sudo ifconfig tap0 192.168.100.1 netmask 255.255.255.0 up


Ok, we're done with the HOST side of this

E) Setting up the GuestOS's network configuration

If you don't have QEMU booted into windows already then do so by this command...
#> qemu -hda win98.img -boot c -net nic -net tap &

Once windows has loaded goto your Control panel and open Network Settings
At the configuration tab Select TCP/IP and click properties

In the Properties window
- Select the IP Address Tab
select specify an IP address
enter 192.168.100.2 as your ip address
enter 255.255.255.0 as your subnet mask
- Select the Gateway Tab
add a new gateway as 192.168.100.1
- Select Ok
Select Ok
Now you will be promted for a restart....restart and you should be able to ping the guestOS from the hostOS

F) Testing the network connection
from a terminal
#> ping 192.168.100.2 -c 4
You should reach 192.168.100.2 if not, verify you followed every step.

Make sure you can Ping the Host from the guest

on Windows from a dosprmpt
#> ping 192.168.100.1 -n 4
You should reach 192.168.100.1 if not, verify you followed every step correctly.

[ Step 3 Complete ]
################################################## ###############

[ Step 4 Setting up NAT to allow GuestOS access to the internet ]
*note: i'm going to go ahead and assume you have iptables already installed.

A) Load Required Kernel Modules
#> sudo modprobe ip_tables
#> sudo modprobe iptable_nat
#> sudo modprobe ip_nat_ftp
#> sudo modprobe ip_nat_irc

B) Enable IP-Forwarding
as root run
#> echo "1" > /proc/sys/net/ipv4/ip_forward

If you get your IP Address Dynamically e.g. PPP0 (Dial-up)
as root run
#> echo "1" > /proc/sys/net/ipv4/ip_dynaddr

Enable SNAT (MASQUERADE) functionality on eth0/ppp0
*note: replace eth0 with ppp0 for dialup

#> sudo iptables -t nat -A POSTROUTING -o eth0 -j MASQUERADE

C) Setup DNS on guestOS
*note: this is for windows98se, methods aren't listed for other OS's

You can retrieve your DNS Server Ip's from your /etc/resolv.conf file after connected to the internet.

#> sudo cat /etc/resolv.conf

In windows, goto control panel -> networking -> TCP/IP Properties -> DNS Configuration
Select Enable DNS

Set Host to your gateway address, i set mine to 192.168.100.1 for my gateway
Set Domain to your Domain i just set it to one of the DNS servers IP Address's
Add your ISP DNS Servers to the DNS List..

Ok, reboot! everything should work fine now..
[ Step 4 Complete ]

After following these steps you should have a working Qemu using the KQEMU accelerator as well as Tun/Tap Virtual Network forwarding Requests from the guest to the internet.
If something isn't working, double check to make sure you set it up correctly.

Thursday, February 4, 2010

Debian Mail Server Setup with Postfix + Dovecot + SASL + Squirrel Mail

Install Postfix MTA (Mail Transfer Agent)

Use the following command to install postfix in debian

#aptitude install postfix postfix-tls libsasl2 sasl2-bin libsasl2-modules popa3d

During installation, postfix will ask for few questions like name of server and answer those questions by entering your domain name and select Internet site for postfix.

Postfix configuration file is located at:/etc/postfix/main.cf. You can edit this file using popular text editor vi /etc/postfix/main.cf

Restart Postfix Server using the following command

#/etc/init.d/postfix restart

Install Dovecot

Dovecot is POP3/IMAP server which needs MTA like Postfix to work properly.

#aptitude install dovecot-imapd dovecot-pop3d dovecot-common

Dovecot configuration file is located at: /etc/dovecot/dovecot.conf

Before we proceed we need to make some changes with dovecot configuration file. Double check the following entries in the file if the values are entered properly.

Edit the dovecot configuration file using the following command

#vi /etc/dovecot/dovecot.conf

# specify protocols = imap imaps pop3 pop3s
protocols = pop3 imap
# uncomment this and change to no.
disable_plaintext_auth = no
pop3_uidl_format = %08Xu%08Xv

Now, create a user to test our pop3 mail with outlook:

#adduser user_name

Note: Always create a separate user to test your mail or ftp.

Restart Dovecot using the following command

#/etc/init.d/dovecot restart

Now, you can use your outlook express to test whether your new mail server is working or not. Just enter username: with password in outlook.

Remember you will NOT be able to send email outside your network, you will be only be able to send within your domain or local network. If you attempt to send email you get “relay access denied” error from outlook express. However, you should have no problems in receiving your email from outlook. Inorder to send email external email you will need to configure SASL authentication as described below.

Configure SASL Authentication with TLS

SASL Configuration + TLS (Simple authentication security layer with transport layer security) used mainly to authenticate users before sending email to external server, thus restricting relay access. If your relay server is kept open, then spammers could use your mail server to send spam. It is very essential to protect your mail server from misuse.

Let us set up SMTP authentication for our users with postfix and dovecot.

Edit the postfix configuration file /etc/postfix/main.cf and enter the few lines to enable authentication of our users

smtpd_sasl_auth_enable = yes
smtpd_sasl_local_domain = yourdomain.com
smtpd_recipient_restrictions = permit_mynetworks,permit_sasl_authenticated,reject_unauth_destination
smtpd_sasl_security_options = noanonymous

postfix does a chroot so it can’t communicate with saslauthd.

#rm -r /var/run/saslauthd/

#mkdir -p /var/spool/postfix/var/run/saslauthd

#ln -s /var/spool/postfix/var/run/saslauthd /var/run

#chgrp sasl /var/spool/postfix/var/run/saslauthd

#adduser postfix sasl

On the Dovecot side you also need to specify the dovecot authentication daemon socket. In this case we specify an absolute pathname. Refer to this postfix manual here

Edit /etc/dovecot/dovecot.conf file

#vi /etc/dovecot/dovecot.conf

Look for the line that starts with auth default, before that insert the lines below.

auth default {
mechanisms = plain login
passdb pam {
}
userdb passwd {
}
socket listen {
client {
path = /var/spool/postfix/private/auth
mode = 0660
user = postfix
group = postfix
}

}

}

Now, rename previous auth default to auth default2. If you dont rename this then dovecot server will give you error like multiple instances of auth default.

Now restart all the following components of mail server

#/etc/init.d/saslauthd restart

#/etc/init.d/postfix restart

#/etc/init.d/dovecot restart

Test whether your mail server works or not with your outlook express. Configure a user with a user name (without @domain) and make sure that you select my server requires authentication. Under settings select same as incoming mail server

Note:
1. If you dont enable My server requires authentication in outlook you cannot send emails to external recipients and you get relay access denied error.
2. Do not use root login to login to your mail server.
3. Dont forget to create a new user before you authenticate using outlook.

Forwarding Mails

Ever wondered how to forward your mails especially if you are a webmaster managing number of sites. You might need to forward any email sent to your primary email address. Its that easy. Just create a .forward file on your home directory. Insert list of emails addresses separated by commas, where you want to get forwarded.

Login as user and type

echo ‘destination_email_address’ > .forward

or you can use vi to create .forward file. Just Delete .forward file if you dont want any forwarding.

Installing Squirrel Web Mail

Before installing Squirrel Web Mail you need to make sure you have installed apache2 with php support

#aptitude install apache2

#aptitude install libapache2-mod-php5 php5-cli php5-common php5-cgi

#aptitude install squirrelmail

Squirrelmail configuration file is located in: /etc/squirrelmail/ folder. By default all settings are preloaded.

# Run squirrelmail configuration utility as ROOT
/usr/sbin/squirrelmail-configure

Now we want to setup to run under apache. Edit apache configuration file /etc/apache2/apache2.conf and insert the following line

Include /etc/squirrelmail/apache.conf

Restart the webserver using the following command

#/etc/init.d/apache2 restart

Access your webmail using the following link

http://yourdomain or server ip/squirrelmail

Create a separate local user and login as a new user.

Mail Server Logs

Always refer to logs located in /var/log/mail.log so that you can identify what the problem is before you can troubleshoot.

A detailed look at the filesystem in Debian

A typical Linux system has, among others, the following directories:

/

This is the root directory. This is where the whole tree starts.

/bin

This directory contains executable programs which are needed in single user mode and to bring the system up or repair it.

/boot

Contains static files for the boot loader. This directory only holds the files which are needed during the boot process.

/dev

Special or device files, which refer to physical devices.

/etc

Contains configuration files which are local to the machine. Some larger software packages, like X11, can have their own subdirectories below /etc. Site-wide configuration files may be placed here or in /usr/etc. Nevertheless, programs should always look for these files in /etc and you may have links for these files to /usr/etc.

/etc/skel

When a new user account is created, files from this directory are usually copied into the user's home directory.

/etc/X11

Configuration files for the X11 window system.

/home

On machines with home directories for users, these are usually beneath this directory, directly or not. The structure of this directory depends on local administration decisions.

/lib

This directory should hold those shared libraries that are necessary to boot the system and to run the commands in the root filesystem.

/mnt

is a mount point for temporarily mounted filesystems

/proc

This is a mount point for the proc filesystem, which provides information about running processes and the kernel.

/sbin

Like /bin, this directory holds commands needed to boot the system, but which are usually not executed by normal users.

/tmp

This directory contains temporary files which may be deleted with no notice, such as by a regular job or at system boot up.

/usr

This directory is usually mounted from a separate partition. It should hold only sharable, read-only data, so that it can be mounted by various machines running Linux.

/usr/X11R6

The X-Window system.

/usr/bin

This is the primary directory for executable pro grams. Most programs executed by normal users which are not needed for booting or for repairing the system and which are not installed locally should be placed in this directory.

/usr/bin/X11

is the traditional place to look for X11 executable's; on Linux, it usually is a symbolic link to /usr/X11R6/bin.

/usr/dict

This directory holds files containing word lists for spell checkers.

/usr/doc

You may find documentation about the installed software packages in this directory.

/usr/etc

Site-wide configuration files to be shared between several machines may be stored in this directory. However, commands should always reference those files using the /etc directory. Links from files in /etc should point to the appropriate files in /usr/etc.

/usr/include

Include files for the C compiler.

/usr/include/X11

Include files for the C compiler and the X-Windows system. This is usually a symbolic link to /usr/X11R6/include/X11.

/usr/include/asm

Include files which declare some assembler functions. This used to be a symbolic link to /usr/src/linux/include/asm.

/usr/include/linux

This contains information which may change from system release to system release and used to be a symbolic link to /usr/src/linux/include/linux to get at operating system specific information.

(Note that one should have include files there that work correctly with the current libc and in user space. However, Linux kernel source is not designed to be used with user programs and does not know anything about the libc you are using. It is very likely that things will break if you let /usr/include/asm and /usr/include/linux point at a random kernel tree. Debian systems don't do this and use headers from a known good kernel version, provided in the libc*-dev package.)

Include files to use with the GNU C++ compiler.

/usr/lib

Object libraries, including dynamic libraries, plus some executable's which usually are not invoked directly. More complicated programs may have whole subdirectories there.

/usr/lib/X11

The usual place for data files associated with X programs, and configuration files for the X system itself. On Linux, it usually is a symbolic link to /usr/X11R6/lib/X11

/usr/lib/gcc-lib

contains executable's and include files for the GNU C compiler.

/usr/lib/groff

Files for the GNU groff document formatting system.

/usr/local

This is where programs which are local to the site typically go.

/usr/local/bin

Binaries for programs local to the site go there.

/usr/local/doc

Local documentation

/usr/local/etc

Configuration files associated with locally installed programs go there.

/usr/local/lib

Files associated with locally installed programs go there.

/usr/local/info

Info pages associated with locally installed pro grams go there.

/usr/local/man

Manpages associated with locally installed programs go there.

/usr/local/sbin

Locally installed programs for system administration.

/usr/local/src

Source code for locally installed software.

/usr/man

Manpages traditionally go in there, into their sub directories.

/usr/sbin

This directory contains program binaries for system administration which are not essential for the boot process, for mounting /usr, or for system repair.

/usr/share

This directory contains subdirectories with specific application data, that can be shared among different architectures of the same OS. Often one finds stuff here that used to live in /usr/doc or /usr/lib or /usr/man.

/usr/share/man

Manpages go in there, into their subdirectories.

/usr/src

Source files for different parts of the system, included with some packages for reference purposes. Don't work here with your own projects, as files below /usr should be read-only except when installing software

/usr/src/linux

This has always been the traditional place where kernel sources were unpacked. This was important on systems that /usr/include/linux was a symlink here. You should probably use another directory for building the kernel now.

/usr/tmp

Obsolete. This should be a link to /var/tmp. This link is present only for compatibility reasons and shouldn't be used.

/var

This directory contains files which may change in size, such as spool and log files.

/var/adm

This directory is superseded by /var/log and should be a symbolic link to /var/log.

/var/backups

This directory is used to save backup copies of important system files.

/var/lock

Lock files are placed in this directory. The naming convention for device lock files is LCK.. where is the device's name in the filesystem. The format used is that of HDU UUCP lock files, i.e. lock files contain a PID as a 10-byte ASCII decimal number, followed by a newline character.

/var/log

Miscellaneous log files.

/var/preserve

This is where vi saves edit sessions so they can be restored later.

/var/run

Run-time variable files, like files holding process identifiers (PIDs) and logged user information (utmp). Files in this directory are usually cleared when the system boots.

/var/spool

Spooled (or queued) files for various programs.

/var/spool/at

Spooled jobs for at(1).

/var/spool/cron

Spooled jobs for cron

/var/spool/lpd

Spooled files for printing.

/var/spool/mail

Users' mailboxes.

/var/tmp

Like /tmp, this directory holds temporary files stored for an unspecified duration.

Tuesday, September 29, 2009

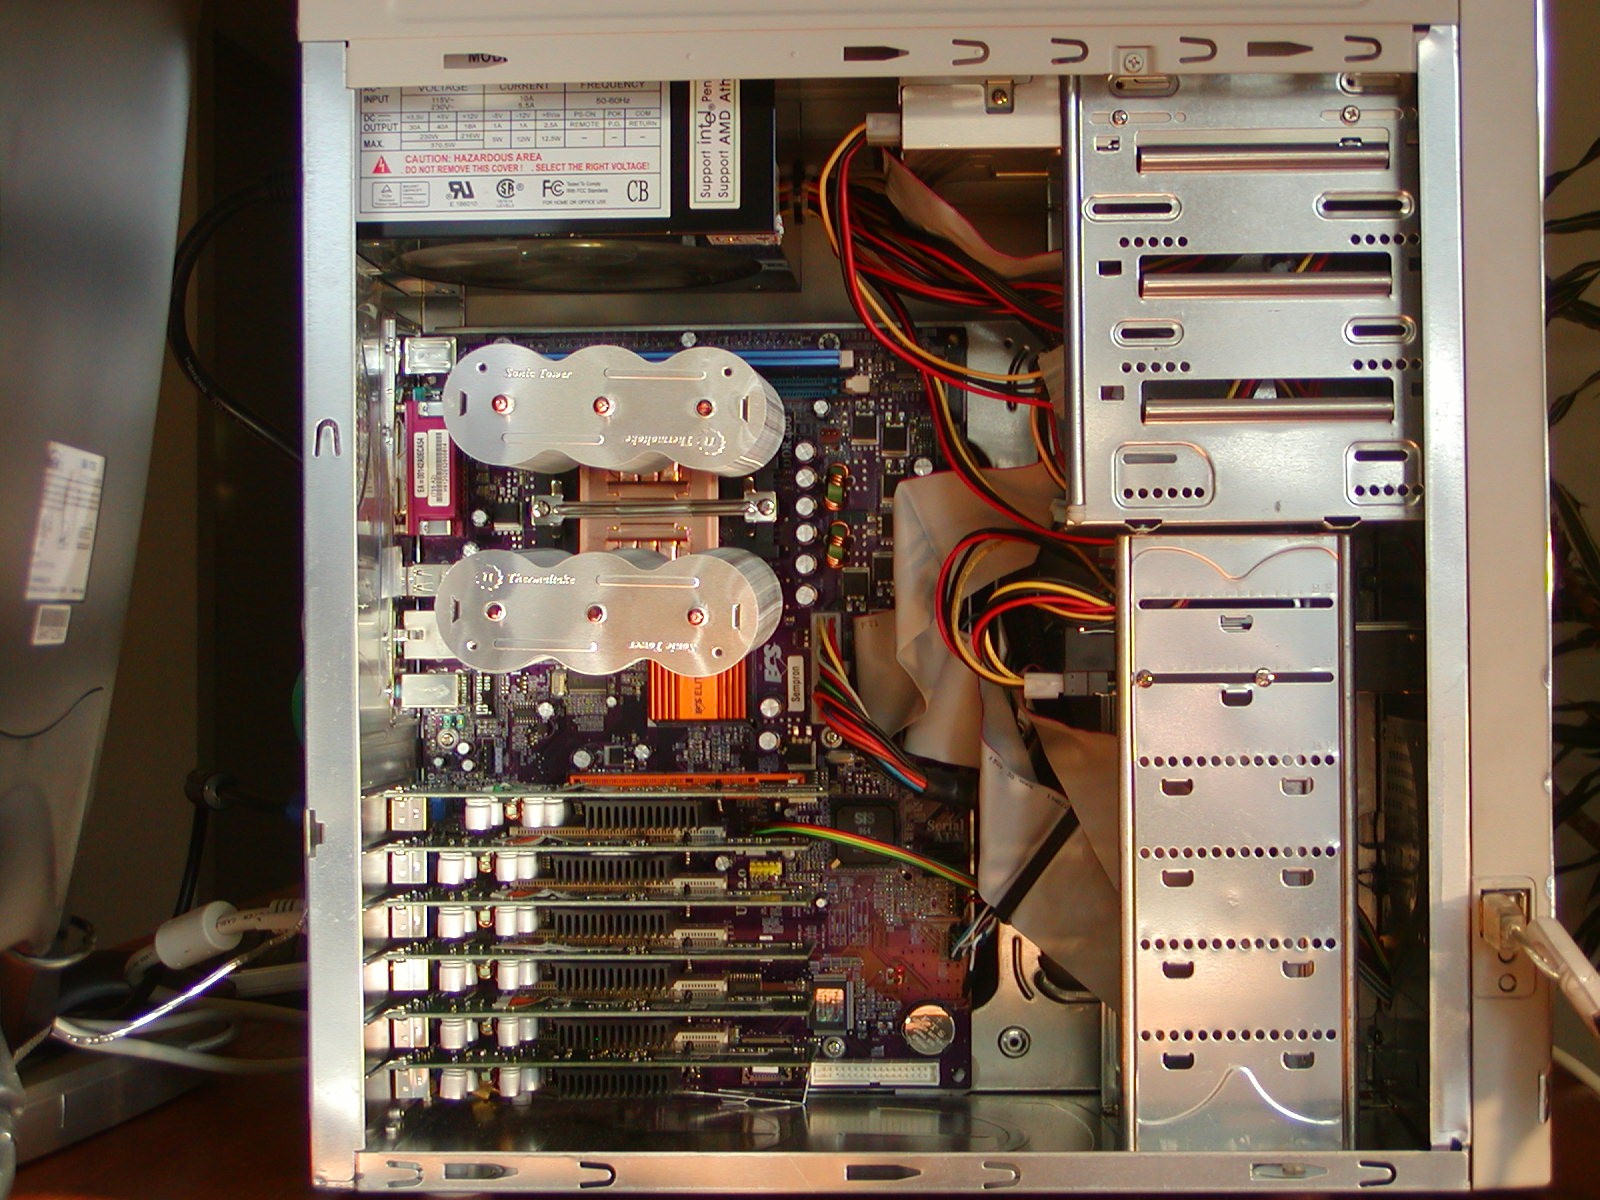
Build a Six-headed, Six-user Linux System

Introduction

Six users on one computer

A Multi-Seat Linux Box: This tutorial shows how to build a multi-head, multi-user Linux box using a recent distribution of Linux and standard USB keyboards and mice. Xorg calls this arrangement a "multi-seat" system.

Advantages of a Multi-Seat System: The advantages of multi-seat systems in schools, Internet cafes, and libraries include more than just saving money. They include much lower noise pollution, much less power consumption, and lowered space requirements. For many applications, power and noise budgets are as important as initial cost.

Requirements: To build a multi-seat system you need a video adapter, keyboard, and mouse for each seat. For six seats, you'll also need a motherboard with an AGP slot and five available PCI slots. In our test system we used USB keyboards and mice exclusively, but you can use a PS/2 keyboard and mouse for one of the seats if you wish.

Xorg 6.9 or later is required, but this already ships with many of the major distributions. Our test system uses the free version of Mandriva 2006 and we did not rebuild the kernel or install any additional packages.

Overview

We divide the implementation of a multi-seat system into five main steps:
  1. Select and Install the Hardware
  2. Install Linux
  3. Record Hardware Configuration
  4. Modify xorg.conf
  5. Modify gdm.conf
After installing the hardware and installing Linux, we read the hardware configuration from the lspci command or from the /proc/bus/input/devices file. Most of the effort in setting up a multi-seat system is in transcribing the hardware information into the xorg.conf file.

Step 1: Select and Install the Hardware

Selecting the Hardware: There are few set rules dictating what hardware to use in your multi-seat system. Of necessity, some of the keyboards and mice need to use USB, but there is no minimum CPU or memory requirements. We suggest building and testing a multi-seat system using a computer that you already have, and using the test results to help scale your hardware requirements. You may be surprised how modest the CPU and memory requirements are for a multi-seat system that is used only for web browsing.

If possible, try to use accelerated video cards, but for increased reliability, avoid video cards with on-board fans. Use recent video cards; older video cards often have a problem sharing the PCI bus. We've had good luck with nVidia cards but you can try recent cards from other manufacturers too.

Hardware for our test system: For our system we chose to use video cards based on the nVidia MX4000 chipset. They are accelerated, have no fans, and it was nice having one driver for all six video cards. The downside of nVidia is that the driver is closed source and you need to download and install it. If you use an nVidia card, be sure to check their web site for the recommended BIOS settings for your cards.

A typical PC We used an ECS 755-A2 motherboard with an AMD64-3200 processor and 1 GB of RAM. Our power supply is a CoolMax 140mm Power Supply and the CPU heat sink is a Thermaltake "Sonic Tower". During our testing we added a low noise fan to cool the video cards. Airflow is in at the bottom, past the video cards, up past the CPU cooler and out through the power supply. This airflow seemed to work pretty well. At quiescence, the CPU temperature was 31C, rising to only 38C after fifteen minutes of kernel compile. The current from the mains at quiescence was 0.25 amps, and during a kernel compile it was 0.35 amps.

You will probably need some USB hubs to connect all of the keyboards and mice. One problem to think about before permanently installing the hardware is cable management. Seven power cords, six monitor cables, three USB hubs, six keyboard cables, and six mice cables: that is a lot of cabling!

Step 2: Install Linux

Multi-seat capability is provided by Xorg 6.9/7.0 which already ships with most of the major distributions. When you install Linux, you might want to install all of the window managers including fluxbox and twm. If you are going to use the nVidia drivers, be sure to install the kernel source too.

Do the installation with all of the hardware connected and powered up. Mandriva did a great job detecting and configuring all six of our video heads. Select a default run level of 3 so that X does not start automatically after boot. You can check the installation by logging in and running startx. If all has gone well you should be able to move your mouse across all six monitors.

Mandriva allows up to ten entries in the /dev/input directory. We needed twelve since we had six keyboards and mice. We increased the limit to sixteen by changing the line in /etc/udev/ruled.d/50-mdk.rules from:

KERNEL=="event[0-9]*", NAME="input/%k", MODE="0600"

to:
KERNEL=="event[0-9a-f]*", NAME="input/%k", MODE="0600"

Step 3: Record Hardware Configuration

All hardware in our computer has a name that distinguishes it from similar hardware in the computer. In this step we record the names for each of our video heads, keyboards, and mice. Let's start with the video cards.

Video cards are identified by their address on the PCI bus. We can list the hardware on the PCI buses using the lspci command. On our test system, the lspci command gives the following result:

lspci | grep VGA
00:09.0 VGA compatible controller: nVidia Corporation NV18 [GeForce4 MX 4000 AGP 8x] (rev c1)
00:0a.0 VGA compatible controller: nVidia Corporation NV18 [GeForce4 MX 4000 AGP 8x] (rev c1)
00:0b.0 VGA compatible controller: nVidia Corporation NV18 [GeForce4 MX 4000 AGP 8x] (rev c1)
00:0c.0 VGA compatible controller: nVidia Corporation NV18 [GeForce4 MX 4000 AGP 8x] (rev c1)
00:0d.0 VGA compatible controller: nVidia Corporation NV18 [GeForce4 MX 4000 AGP 8x] (rev c1)
01:00.0 VGA compatible controller: nVidia Corporation NV18 [GeForce4 MX 4000 AGP 8x] (rev c1)
The bus address is the first field in the lines above. The number before the colon identifies which PCI bus (computers often have more than one), and the second number gives the card address on the bus. You will need to know these addresses to build the xorg.conf configuration file.

The mice are easy to locate. Each mouse has an entry in the /dev/input directory. An ls can identify the mice.

ls /dev/input/mouse*
/dev/input/mouse0 /dev/input/mouse2 /dev/input/mouse4
/dev/input/mouse1 /dev/input/mouse3 /dev/input/mouse5
The keyboards are identified as a /dev/input/eventN file. Do a more of /proc/bus/input/devices. Each keyboard will have an entry that specifies the event file. The following two entries are for the first two keyboards in our system.
more /proc/bus/input/devices

I: Bus=0003 Vendor=046e Product=530a Version=0001
N: Name="BTC Multimedia USB Keyboard"
P: Phys=usb-0000:00:03.3-4.2.1/input0
H: Handlers=kbd event6
B: EV=120003
B: KEY=1000000000007 ff87207ac14057ff febeffdfffefffff fffffffffffffffe
B: LED=1f

I: Bus=0003 Vendor=046e Product=530a Version=0001
N: Name="BTC Multimedia USB Keyboard"
P: Phys=usb-0000:00:03.3-4.4.1/input0
H: Handlers=kbd event7
B: EV=120003
B: KEY=1000000000007 ff87207ac14057ff febeffdfffefffff fffffffffffffffe
B: LED=1f

A table is a nice way to view all of the above information.

Seat Video Card Keyboard
(/dev/input/)
Mouse
(/dev/input/)
0 00:09:0 event6 mouse0
1 00:10:0 event7 mouse1
2 00:11:0 event8 mouse2
3 00:12:0 event9 mouse3
4 00:13:0 event10 mouse4
5 01:00:0 event11 mouse5

Note the slight change in how the video cards are addressed. Also, you'll find the numbering of the keyboards and mice easier if you plug each mouse into the same hub as its corresponding keyboard. Don't worry too much about matching the video head to the keyboard. After setting everything up you can move the monitors or the keyboards around as needed.

Step 4: Build xorg.conf

The xorg.conf file has sections to describe keyboards, mice, video cards, monitors, screens, and seats. Most of the work in setting up a multi-seat system is correctly copying the information in the above table into the appropriate section of the xorg.conf file. Shown below is our configuration for seat 5. You should be able to use this configuration as a prototype for your additional seats. Note the places where the keyboard, mouse, and video card information is located. Since we were borrowing monitors for our test, we forced all of the monitors to be flat panel displays with a 1024 by 768 resolution.
# Seat 5
Section "InputDevice"
Identifier "Keyboard5"
Driver "evdev"
Option "Device" "/dev/input/event11"
Option "XkbModel" "pc105"
Option "XkbLayout" "us"
Option "XkbOptions" "compose:rwin"
EndSection

Section "InputDevice"
Identifier "Mouse5"
Driver "mouse"
Option "Protocol" "ExplorerPS/2"
Option "Device" "/dev/input/mouse5"
Option "ZAxisMapping" "6 7"
EndSection

Section "Device"
Identifier "device5"
Driver "nvidia"
VendorName "NVIDIA Corp."
BoardName "NVIDIA GeForce4 (generic)"
BusID "PCI:0:13:0"
EndSection

Section "Monitor"
Identifier "monitor5"
ModelName "Flat Panel 1024x768"
HorizSync 31.5 - 48.5
VertRefresh 40.0 - 70.0
ModeLine "768x576" 50.0 768 832 846 1000 576 590 595 630
ModeLine "768x576" 63.1 768 800 960 1024 576 578 590 616
EndSection

Section "Screen"
Identifier "screen5"
Device "device5"
Monitor "monitor5"
DefaultDepth 24
SubSection "Display"
Virtual 1024 768
Depth 24
EndSubSection
EndSection

Section "ServerLayout"
Identifier "seat5"
Screen 0 "Screen5" 0 0
InputDevice "Mouse5" "CorePointer"
InputDevice "Keyboard5" "CoreKeyboard"
EndSection

There is a simple trick to help verify that all the numbers in the xorg.conf file are right -- pass the file through sort and uniq.
   sort /etc/X11/xorg.conf | uniq

[ 'sort xorg.conf|uniq -d' would also be helpful - just in case you had mistakenly repeated any of the device strings. -- Ben ]

The output of the above command string will make obvious any errors in numbering the various keyboards and such.

Testing Your Xorg.conf File: It is a good idea to test your configuration and to sort out the keyboards and mice by bringing up the heads one at a time. Login remotely so that you are not using any of the video heads. Enter the following commands for each of the six heads (0 to 5). (The commands below are for head 5.)

X -novtswitch -sharevts -nolisten tcp -layout seat5 :5 &
xterm -display :5 &
If the above command fails, examine the error messages and check the xorg.conf file. If the command succeeds, use the xterm to help identify which keyboard and mouse go to which head. The keyboards, mice, and video cards are enumerated in the same order on every boot, so you will only have to move things around during the initial set up.

The above commands might be sufficient if you don't need user logins. For example, a six headed kiosk might need only X and a web browser on each head.

Step 5: Modify gdm.conf

If you want user logins you will need to modify the configuration for your preferred display manager. The directions given here are for gdm but the changes are very similar for kdm, or for the X display manager, xdm.

Modify the [servers] section near the bottom of the /etc/X11/gdm/gdm.conf file to tell gdm which X servers to start. The lines should be:

0=Standard0
1=Standard1
2=Standard2
3=Standard3
4=Standard4
5=Standard5
You need to tell gdm how to start the X server on each head. The lines to do this are:
[server-Standard5]
name=Standard server
command=/usr/X11R6/bin/X -nolisten tcp -novtswitch -sharevts -layout seat5
flexible=true
You'll need a section like the above for each head. The server name, "Standard5" in the above example, must match the name given in the [servers] section. Customize the X command line options to meet the requirements of your particular system.

Once everything is configured, you should be able to start graphical logins by switching to runlevel 5.

telinit 5
If everything works, make the default runlevel 5 by editing /etc/inittab or by setting it using drakconf.

Test Results, Costs, and Problems

Performance Results: Between resets, we found performance to be excellent for six users doing typical PC tasks, including web browsing, email, word processing, and games. The accelerated graphics cards seemed to do most of the work so that even arcade style games and web-based video did not put much of a load on the CPU. If "3200" is an accurate assessment of the performance of the AMD64-3200, then a CPU with a performance of "1600" would have been more than sufficient.

Cost: Not including the monitor, each seat in our system cost about $67. This includes $40 for the MX4000 based video card, $20 for a USB keyboard, $5 for a USB mouse, and $2 for half of a USB hub. Our test system used expensive keyboards that have a built-in USB hub which we intended for per-user flash drives or audio players.

The shared part of our system cost about $520. This includes $180 for the CPU, $50 for the motherboard, $90 for RAM, and $50 for the CPU heat sink. The case, power supply, and disk drive had a combined cost of about $150.

We give these prices just for comparison. You may find lower prices that these and we'd certainly recommend that you replace our $230 CPU and motherboard with an Athlon 2800+ set that costs about $80. We have not included the cost of the monitors since these prices are in free fall and your particular needs and tastes may dictate what you spend.

Problems: Did you catch the phrase "between resets" above? While the system worked very well, it was extremely unstable. In particular, we got a kernel oops fairly often when we logged out. A syslog trace of one such oops is available here. We've tried several things to fix this problem including:

  • turning APIC off and on
  • reducing the number of heads
  • trying the 'nv' and 'vesa' drivers
  • using NoInt10
  • upgrading to the official X11R6.9 release
  • upgrading to the 2.6.15 kernel
  • using xdm and fvwm instead of gdm and Gnome
The problem persists. Please let bsmith at linuxtoys dot org know if you have any ideas that might help fix this problem.

A much less severe problem is that some programs assume that there is a single user on the PC. Screen savers can take a lot of CPU power and both KDE and Gnome complain if they don't have audio output. Any shared resource, such as audio or a CD burner, can be a problem.

As a longer-term concern, we will need to address security issues surrounding multi-seat computers. Whether from students or cafe patrons, these systems are going to come under deliberate, malicious attack. Can we trust KDE and Gnome to withstand such attacks?

Summary

A multi-head, multi-user Linux system is now possible using commodity PC hardware and standard Linux distributions. Multi-seat Linux PCs seem inevitable given the potential savings in cost, noise, and power.

Further Reading

Chris Tyler's page: Chris Tyler provided support at almost every step of the way in this project. His web site has a HOWTO that also describes how to set up a multi-seat system. Chris is something of an expert in X and I'm looking forward to his next book which will contain some of the material presented here. Chris' web site is at:
http://blog.chris.tylers.info/

Xorg man pages: Xorg provides a full set of manual pages that describe the xorg.conf file and all of the commands used in getting X-Windows to run. The manual page for xorg.conf is at:
http://wiki.x.org/X11R6.9.0/doc/html/xorg.conf.5.html

The manual pages for the X commands are at:
http://wiki.x.org/X11R6.9.0/doc/html/manindex1.html

Cacti The ULTIMATE Management Solution

Purpose

The purpose of this document is to explain how to install Red Hat’s Fedora Core 2 product and utilize a suite of applications for network based SNMP management. This document will take you thru step-by-step how-to install Linux on a new system and configure all the necessary tools that will get you a fully functional SNMP management station. SNMP management can be used to monitor just about anything on just about any IP enabled device.

Requirements

Before you get started make sure you have the following things:

. • Fedora Core 2 CD’s 1 thru 3

. • Active Connection to the Internet

. • Computer that can be formatted and have a new OS installed from scratch

. • About 3-4 hours of time

How it works

Cacti uses a suite of applications to do visual web front end graphing of results pulled via SNMP। These SNMP values can range from input/output rates on network / server interfaces to the number of mac-addresses associated to a given access-point. Using SNMP to manage a network can provide a non­technical central point of consolidation and health monitoring of your infrastructure. As stated earlier, SNMP is something that is already or can easily be enabled on many IP capable devices. Using SNMP to constantly pull statistical information and graphing that information can be useful in tracking things like disk utilization, network activity and much more. The CACTI application requires several utilities to be configured to work together in order to present the information in a GUI web front end. These utilities include a web server, a database, PHP and RDTOOL. All of which is freely available for the Linux operating system.

Show me the Files

You are now ready to begin downloading the files necessary to install and run Cacti. This can be done via the command line (CLI) using a command called wget. Before we start downloading the files we must first create a directory that we want to download the files to. For sake of this how-to that directory will be located under the root file system (/) in a directory called cacti-install. (Remember you should be logged in as root for the duration of this how-to. After all is setup you can login as a normal user and sudo for root privileged commands if you wish).

Run these commands as root

mkdir /cacti-install cd /cacti-install

wget http://apache.mirrors.versehost.com/httpd/httpd-2.0.52.tar.gz

wget http://us4.php.net/get/php-4.3.8.tar.gz/from/this/mirror

wget http://dev.mysql.com/get/Downloads/MySQL-4.0/mysql-4.0.21.tar.gz/from/http://www.signal42.com/mirrors/mysql/

wget http://people.ee.ethz.ch/~oetiker/webtools/rrdtool/pub/rrdtool-1.0.49.tar.gz

wget http://unc.dl.sourceforge.net/sourceforge/net-snmp/net-snmp-5.1.2.tar.gz

wget http://www.cacti.net/downloads/cacti-0.8.6b.tar.gz

File Download Scrip


Once you have downloaded the files it is HIGHLY recommended to check the directory and make sure all the files are actually downloaded. As noted earlier version numbers change and the location of the files may change so the wget script will fail if that is the case. If they fail during download you must fine a new location

Install MySQL

Run these commands as root

cd /cacti-install

tar -zxvf mysql*

cd mysql*

./configure --prefix=/usr/local/mysql

make

make install

groupadd mysql

useradd -g mysql mysql

scripts/mysql_install_db

chown -R root /usr/local/mysql

chown -R mysql /usr/local/mysql/var

chgrp -R mysql /usr/local/mysql

rm -f /etc/my.cnf

cp support-files/my-medium.cnf /etc/my.cnf

echo /usr/local/mysql/lib/mysql >> /etc/ld.so.conf

echo /usr/local/lib >> /etc/ld.so.conf

ldconfig –v

cp support-files/mysql.server /etc/init.d/mysql /usr/local/mysql/bin/mysqld_safe --user=mysql & Echo

cd /etc/rc3.d/

ln -s ../init.d/mysql S85mysql

ln -s ../init.d/mysql K85mysql

cd /etc/rc5.d/

ln -s ../init.d/mysql S85mysql

ln -s ../init.d/mysql K85mysql

cd /etc/init.d/ chmod 755 mysql

MySQL Install Script


Install Apache

Run these commands as root


cd /cacti-install


tar -zxvf httpd*


cd httpd*


./configure --prefix=/www –enable-so


make


make install


cd /www/bin


cp apachectl /etc/init.d/httpd


y


cd /etc/rc3.d/


ln -s ../init.d/httpd S85httpd


ln -s ../init.d/httpd K85httpd


cd /etc/rc5.d/


ln -s ../init.d/httpd S85httpd


ln -s ../init.d/httpd K85httpd


/www/bin/apachectl start


Apache Install Script


Install PHP

Run these commands as root

cd /cacti-install

tar -zxvf php*

cd php*

./configure --prefix=/www/php --with-apxs2=/www/bin/apxs --with-config-file-path=/www/php --enable-sockets --with-mysql=/usr/local/mysql --with-zlib­dir=/usr/include –with-gd

make

make install

cp php.ini-dist /www/php/php.ini

cp /www/conf/httpd.conf /www/conf/httpd.conf.backup

echo ####################### >> /www/conf/httpd.conf

echo # Added via Lee Carter's Script >> /www/conf/httpd.conf

echo ####################### >> /www/conf/httpd.conf

echo AddType application/x-tar .tgz >> /www/conf/httpd.conf

echo AddType application/x-httpd-php .php >> /www/conf/httpd.conf

echo AddType image/x­icon .ico >> /www/conf/httpd.conf

echo DirectoryIndex index.php index.html index.html.var >> /www/conf/httpd.conf service httpd stop

service httpd start

PHP Install Script


Configure MySQL


Run these commands as root

cd /cacti-install

group-add cacti

useradd -g cacti cactiuser

/usr/local/mysql/bin/mysql

mysql> set password for root@localhost=password('rootpw');

mysql> create database cactidb;

mysql> grant all on cactidb.* to root;

mysql> grant all on cactidb.* to root@localhost;

mysql> grant all on cactidb.* to cactiuser;

mysql> grant all on cactidb.* to cactiuser@localhost;

mysql> set password for cactiuser@localhost=password('cactipw');

mysql> exit

MySQL Configure Script


Install RRDTOOL


Run these commands as root

cd /cacti-install

tar -zxvf rrdtool*

cd rrdtool* ./configure --prefix=/usr/local/rrdtool

make

make install

RRDTOOL Install Script


Install NET- SNMP


Run these commands as root

cd /cacti-install

tar -zxvf net-snmp*

cd net-snmp*

./configure

make

make install

NET-SNMP Install Script


Install Cacti


Run these commands as root

cd /cacti-install

cp cacti* /www/htdocs/

cd /www/htdocs/

tar -zxvf cacti*

mv cacti-0.8.6b cacti/

cd /cacti /usr/local/mysql/bin/mysql --user=root --password=rootpw cactidb <>

Cacti Install Script


Now edit your /www/htdocs/cacti/include/config.php

The finished product should look like so:

$database_defaut = “cactidb”;
$database_hostname = “localhost”;
$database_username = “cactiuser”;
$database_password = “cactipw”;

Now add the following line in your /etc/ctrontab The finished product should look like so:

*/5 * * * * cactiuser /www/php/bin/php /www/htdocs/cacti/poller.php > /dev/null 2>&1

NOTE*** DO NOT RUN THE ABOVE COMMAND. LET THE CRONTAB FILE RUN IT.

If you run the above command as root there will be several files created under ...../rra and ..../log that will now be owned by the user ROOT and your graphs will NOT populate correctly. So the moral is... JUST TYPE IN WHAT YOU SEE ABOVE AND SAVE THE FILES. DONT RUN THEM.


Finalize Setup

You are now ready to finalize the setup process for cacti. To do this you will need to point your browser to the IP address of the cacti system like so:

http://localhost/cacti

or

http://remoteIP/cacti

1. Click Next

2. Default (New Install) -> Click Next

3. Two errors locating php and rrdtool to Fix them replace what they have with:

RRDTOOL = /usr/local/rrdtool/bin/rrdtool

PHP = /www/php/bin/php

4. Click Finish

5. Login admin/admin

6. Change Password for user admin

7. Click Save


That'it! Your done. Congratulations on your new install. You can now start playing with the cacti utility it's self. I highly recommend going to the message boards to find add-ons and helpful hints when trying to do any advanced things in cacti. This is a highly versatile utility and is really only limited to your imagination.